Thursday, April 28, 2011

Oktoberfest!

Last night I brewed my first lager, an Oktoberfest brew. I am very excited about this one both because it's my first lager, and I love Marzen style beer. The brewing process went well, I did not have any boilovers and made very little mess in general. Cooling the wort is the only part of the process that worries me - everything I read focuses on the importance of cooling quickly to minimize the risk of bacterial infection in my beer. The ice water in the sink method is not working. It took almost 25 minutes to cool the wort to 120 degrees last night, I which point I funneled it into the carboy which had cool water in it already. I then poured another half gallon of cold water on top and then took a sample. At this point I ran into a problem - my turkey baster wouldn't reach the wort in the new 6 gallon carboy, sooooo I had to siphon it, which was a pain, but it worked. My OSG was a little low at 1.041 instead of 1.056-1.058 so we'll see how that turns out. My suspicion is that I am adding to much cool water to the wort. A suggestion I have and will be using from now on is to measure out 5 gallons of water and pour it into all of your carboys - then mark the level. That way you know exactly when to add and stop adding water to your wort. Another difference between this brew and the first two was that I used the fabled StarSan sanitizing solution, a no rinse sanitizer. When you talk to people about it, or read about it, most people tell you "not to fear the bubbles". They aren't kidding. This stuff foams like a rabid dog, but I went on with the process, there were still some suds in the bottom of my carboy at transfer time and it does worry me. Mostly on account of the fact that it's a sanitizer and I don't want it killing the yeast. After that I pitched the yeast at 70 degrees and put the fermenter in the fridge at 50 degrees.

This morning there was no sign of active fermentation - adding to the worry of the starsan. However, many publications say that it can take up to 48 hours for the yeast to get moving in a lager so I'll wait it out and let you know how it goes.

A few more details about the brew: I used 6.6 pounds of Munich LME, 1 pound of Amber DME, and steeped 8 oz. of cracked Caramel Malt 60L with 4 oz. of cracked Caramel Malt 20L for 20 minutes prior to boil. For hops, I used 1 oz. of Willamette boiled 60 minutes for  bittering and another ounce of Willamette boiled 20 minutes for flavoring. The yeast used was White Labs' WLP820 Oktoberfest/Marzen.


And for the moment that's that.

Now, as I've mentioned I'm going to give you a chance to win your very own Upship! Brewing T-shirt. Here's the deal. I'm going to simply draw names out of a hat - literally. In order to get your name in the hat you need to comment on this post and in addition to whatever else you'd like to say you need to reveal your favorite style of beer. I'll draw the names sometime next week. So get commenting!

Monday, April 25, 2011

Temperature Controller

Acquired a new newfangled gadget today, colloquially referred to as a "freezer/refrigerator temperature controller," courtesy of HomeBrewStuff.com. This sucker plugs into a wall outlet which you then plug your fridge or freezer into; then you set the thermostat to your desired temperature and run the sensor into the fridge in a cup of water (this helps maintain a stable temperature for the sensor so it doesn't click on and off every time you open and close the door). What the unit does is open and close the power circuit to the fridge or freezer to maintain a very exact temperature - VERY useful for lagering. Especially if you don't have access to an Alpine Cave - or so they say in Home Brewing for Dummies. I've put my good friend Andrew out in the field (he's a pretty badass electrician) to see about the possibility of making these units at home - if it's possible I'll put his how-to up for all to see! Anyway, here is a shot of the unit:
Tomorrow - Oktoberfest!
-Jack

Friday, April 22, 2011

Exploding (Rum) Bottles!

So I spent about an hour today cleaning up all my bottles and my cooler after a bottle exploded. Not a beer bottle, the rum bottle I used in desperation when coming to the realization that I had far too much beer and too few bottles to put it in. Let me emphasize something you should already know prior to bottling - from all the reading you should do prior to making your first batch of beer - you need to use QUALITY bottles; beer bottles. There are two outstanding reasons for this: 1) they are less likely to explode under the pressure created in conjunction with carbonating your brew; 2) they'll last longer and you can re-use them more times (forever...?) before they break. A tertiary reason is that you will be less likely to have to deal with this (or worse):
However, the single most important reason, the one you really should care about - you won't waste any of your precious brew! I'm already down a good majority after running short on bottles and now losing my last-ditch-effort rum bottle. So, get good BEER bottles and save yourself some time, and good beer.

A few off-topic notes: I ordered a new gadget today - a "Freezer/Refrigerator Thermostat". This doohickey has a probe that runs into your fridge or freezer and out to a thermostat box on which you select a desired temperature; that is desired temp, singular, not a range. The thermostat plugs into your wall outlet and your fridge or freezer plugs into the thermostat. Then the thermostat turns the whole appliance on and off to reach and maintain your exact, specified temperature. This is crucial for good lagering of your beer; or so I've read. I also ordered - this stuff from Home Brew Party - another stopper and fermentation lock assembly (another thing I forgot last weekend) as well as some additional Amber DME which I will use to prime the American Amber currently in the primary fermenter; as opposed to dextrose/corn sugar, the use of extract is the purist method of carbonation. Last, I picked up a whole bunch of Oxi-Clean at the local WallyWorld to ease the removal of gunk from the inside of my carboys. And now, I should have all I need to simply BREW for a good while!

Oktoberfest/Marzen week next week! Also be on the lookout to for a chance to win your very own Upship! Brewing T-shirt!
- Jack

Thursday, April 21, 2011

Second Brew! - American Amber

 After all the votes were tallied, and there were a few, American Amber was the top pick. And as of last night, it has been brewed!

Again, I made a mess - this time it was much smaller though, and I'm hoping next time even more so; maybe not even messy at all! First let's get a few short lessons learned out of the way: when using Dried Malt Extract (DME) have your bittering hops ready to go before you add the DME to your wort. This is based on the experience I had last night - another boilover. It occured immediately after I stirred in my DME (a crystal amber if you were wondering) and continued to make additional attempts - thwarted by my masterful heat control - until I added my hops. As soon as I dumped the hops in the "head," if you will, dispersed right away. Additionally, having a funnel this time cut the mess I made in half. And, get a funnel...a BIG one. I suspect that the monstrous size of it contributed to the fact that I spilled exactly 0 beer transferring from the brew pot to the carboy. Check this thing out!

One more thing to remember if your tap water is chlorinated - bottled water! I had to make a last minute trip to the local gas station to pick up the 5 gallons of water needed for my brew.
2 gallons...3 more to go. I just told the clerk I was thirsty.

Some other things I tried this time were using the B-brite sanitizer that was included in my original brewing kit; as opposed to bleach. This was awesome as it requires only 30 seconds of contact time with the equipment to thoroughly sanitize it, and then a quick rinse with cool water and it's ready to go! On the next batch I will be utilizing StarSan - a no rinse sanitizer requiring only 30 seconds as well - which I picked up this weekend (see below). Also, I used a large nylon filter bag, one big enough to sit around the lip of a brew/bottling bucket and line all the sides and bottom. I placed this inside the large funnel - which already has a built in filter - when transferring the wort to the fermenter to catch the hops and other sediment. And finally, I employed liquid yeast this time, specifically "designed" for the brewing of American Amber - in this case a California Common strain.
Liquid Yeast - remove from fridge AT LEAST 3 hours prior to pitching time.
Overall the process was much easier than the first time, and very enjoyable. I am very excited for this brew! It should be awesome. It's already fermenting quite actively - after vigorous agitation last night following the pitching of the yeast.
Here are a couple more shots - the first is of the main ingredients for the brew, the second is the initial wort with steeping grains in the sock, and the last is the wort in the sink for the cool down.
Clockwise from bottom left: DME, Liquid Malt Extract (LME), included (but not used) dry yeast, priming sugar, bittering hops (Brewer's Gold), Aromatic Hops (Willamette).
The bottling date is set to be the 3rd of May - two days after "Drinking Day" for the New Home, Brew.

I also acquired some additional equipment and gadgets at my new "almost-local" brew shop, Home Brew Party, in San Antonio. Let me say that HBP is AWESOME! They have everything, and I mean EVERYTHING, even fully constructed corny kegs ($195 if I remember correctly - not a bad deal).I picked up another carboy to serve as a primary fermenter - this one is a six gallon unit! A few other items I picked up included a bottle washer, the nylon strainer, two liquid yeast tubes (one for each forthcoming brew), and some StarSan.

Next on the list of activities: Brew some Oktoberfest! This endeavor will include both my first secondary fermentation and my first lagering - and a long lagering at that.

Your comments, criticism, and petitions for free beer are always welcome!
Stay Classy,
Jack

Tuesday, April 19, 2011

Bottling Day and a preview of things to come...

Well this weekend I did indeed bottle my first ever batch of beer! It was pretty successful, but in line with the rest of the process, it was also a mess. Just to get the lessons-learned out of the way: before you bottle MAKE SURE YOU HAVE ENOUGH BOTTLES!!!! It's heart-wrenching to pour any of your beer down the drain...I'm sad to say that I ended up have to do this; I exhausted all resources - there's even some beer bottled in a rum bottle which I cleaned and sanitized at the last minute...we will see how that goes. Second, bottle somewhere you  can easily clean up the mess; my bottling bucket's spigot seal leaked and slowly created a sticky beer puddle on the floor which took endless passes of the swiffer wet-jet to clean up (a good suggestion is to bottle in the bathtub!). Now on the list of "things-that-worked-out-great!" the swingtop bottles I used were EXCELLENT! I highly suggest using swing-tops for bottling for a number of reasons: 1) it's easy; 2) it's much much faster; and 3) more beer per bottle.

Now, here's the general outline of the bottling process:
First I cleaned and sanitized all the bottles and bottling equipment, to include the bucket, racking cane, siphon tube, "bottling stick", and bottle caps/swing tops. The  bucket I sanitized with bleach, everything else I used B-brite on, except the actual bottle caps - those I sanitized in vodka, they were the oxygen absorbing type so I couldn't boil them. While everything was sanitizing I boiled my corn sugar and water to pitch into the beer just prior to bottling - this is what the yeast eats to create the carbonation in the beer.
A whole bunch (but still not enough) sanitized bottles.
After everything was sanitized and rinsed I poured the corn sugar solution into the bottling bucket then siphoned the beer out of the carboy into the bucket - called racking it over; an important part of the process is to remember not to splash the beer, you don't want to oxidize it - the mantra is "siphon smoothly and quietly". Once all the beer (not including the sediment!) is siphoned into the bucket you simply start bottling.
All the beer, ready for bottling!
The bottling process is simple - assuming you have the simple bottling "stick" I had which attaches to your spigot and is activated by pressure; in this case the bottom of the inside of the bottle, and fills from the bottom up - further minimizing oxidation again. After you fill up the bottle you cap it. Even with my basic two-handed capper this was a simple task; simpler still were the swing tops. When you're done bottling all (hopefully) of your beer just put it back in a dark corner and let it sit a couple of weeks. This story will continue when I get to that point: 31 April, 2011.
Close to half of the finished bottles - the cooler was full and then some!
Between now and the time I crack open the first homebrew however, I plan on starting one, maybe even two new brews! The first, by a unanimous poll, will be an American Amber, the second will be an Oktoberfest Brew, and my first attempt at both secondary fermentation as well as Lagering! Not to mention a TRUE test of patience as my intent is to wait until September to bottle it, if that's reasonable, and then enjoy it in true German style at the end of September and Early October! The Amber I hope to start this week - be on the lookout for a post on that brew!

Until then...

Jack
Myself, first-ever homebrew, and the red hue I received earlier that afternoon on the lake.

Wednesday, April 13, 2011

Time to bottle?!

It has been 1 week, precisely, since the beer went into the carboy - so this afternoon I took a sample using a very high tech turkey baster:

The  hydrometer indicated a specific gravity of 1.015 - the intended final specific gravity according to the recipe was 1.012 so it's either done, or very very close to being done! I will keep tabs on it the next few days taking samples each day to monitor the final gravity - if it seems like it has stabilized then I believe I will bottle this weekend! It just so happens that I have a special "Bottling Assistant" here to help out this weekend, so that would be perfect! If I were to bottle now, the calculate ABV (alcohol by volume) would be just a hair under 4%.

Also...
A Lesson-to-learn-from:  acquire a "wine/beer thief" or turkey baster to use for taking samples of the beer for specific gravity readings.


Quick push to remind people to VOTE for the next Upship! Brew.

- Jack

Thursday, April 7, 2011

Fermentation!

I appreciate all of your crossed fingers - I'm sure your hands are cramped by now so please uncross them, get a hand massage, and then check out the evidence of all those good vibes you sent this way:
Yeast doing solid work - impressive little guys aren't they?


Fermentation Lock in action - all those bubbles are escaping CO2 gas; a bi-product of fermentation, and happy yeast.


I also went to Walmart today with the SOLE purpose of acquiring a funnel. While I was there I picked a couple of these bad boys up to solve my thermometer problem:

Simple fish tank thermometer - $2.34 a piece, reads in both Fahrenheit and Celsius.
Of course I did not get a funnel while I was there - I know what you're thinking, "Walmart didn't have a funnel!?" And that would be a nice excuse, however, I completely forgot about it. Again. Maybe next time I'll get in there and find one - or find one at the brew supply shop in San Antonio (the closest one to my knowledge).

In summary, all is well on the home brew front, and hopefully will carry on in this blissful state.
This is Jack signing off, and remember "Happy  Beer Comes From Happy Yeast!" (Trademarked).

Wednesday, April 6, 2011

From Extract to Fermentation - Day 1

I'm happy to say that today the first steps (and arguably DEFINITELY the hardest) were taken to produce the very first Upship! Brew. Henceforth called "New Home Brew!" Admittedly, before actually undertaking the  brewing process it did seem mildly intimidating. However, I'm happy to confirm that it's pleasantly simple-even more simple I would bet if you have all the stuff you need!

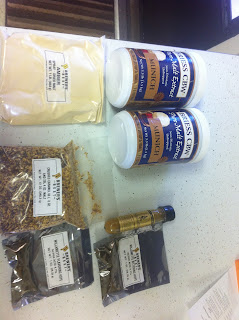
The first Upship! brew is an all-extract wit beer. Meaning that it was produced using only malted barley extract - as opposed to taking malted barley, mashing it, then boiling it to create my own "extract"; some other grains were added to the extract during the boiling of the "wort" to add flavor and additional sugars.
Wort!


Hops added to wort using a steeping bag.
The hops were also added to the wort during heating. After the heating process the wort was added to the carboy (which was already filled with 3 gallons of "cool, clean water"*) and allowed to cool to below 78-degrees (F) before taking a specific gravity reading with the hydrometer and "pitching" in the yeast. After pitching the yeast I capped the carboy with the fermentation lock and set it in a dark corner to sit for approximately two weeks.
*-quoted out of The Complete Joy of Homebrewing; my chosen text for directions during this first brew.
Pre-fermented beer, the "brewing" phase is over, now comes the waiting phase...
"waking up" the yeast - prior to pitching

And that's that - good "First Home Brew" beer is soon to come!
 
....or the simplified story anyway...in reality:
-wanna learn from my mistakes? -just read the highlighted segments

I made a HUGE mess! As promised when this little outfit was founded, you can now learn from my failures...and hopefully some success yet. First things first --> make sure you have EVERYTHING you need! In my particular case, a FUNNEL. And in case you are thinking, "I don't need no stinkin funnel!"...you absolutely do need a "stinkin funnel". Really. For the following reasons: 1) you will make significantly less of a mess than I did - that's guarantee, or I owe you a beer; 2) wort is hot, no s*** huh?, you boil it for an hour and then have to pour it into your carboy - without a funnel this is dangerous, and it hurts; 3) cut up one-gallon water jugs don't work, they also deform under the heat.

One other thing you definitely need is a thermometer so that you aren't left guessing when your wort is ready to measure the initial specific gravity, or cool enough to pitch the yeast - I guessed both of these using the trusted "back-of-the-hand" method, not suggested. Make sure you GET A THERMOMETER, and use it.

This hardcore mess was caused by a boil over in the first 5 minutes - which was caused by putting the lid on the pot, "just for a second, and I'll be watching". I literally read not to do this exact maneuver like five or six times, there's a good reason they told me not to; so take their word for it, and my picture, and don't put a lid on your wort. (On a side note: I JUST started moving into this house today, and that is a brand new, never-used stove - broke that sucker in!)

Lastly, get something to take your specific gravity measurements in. I didn't and ended up having to use this large pint glass (this "potential" beer took one for the team) as it was the only vessel I had in my new, yet-to-be-furnished house tall enough to allow the hydrometer to float freely and allow for an accurate specific gravity reading. I'm not sure what to suggest but I bet there are one or two of you out there who could comment on this as a suggestion - Doug Zschoche of Zschoche Cellars, for example, is a perfect candidate as I know he just did this, a few times! Anyway, I suggest trying to find something so as to brew more good beer and waste less!


 That's the real story! I'll post an update tomorrow as to how the initial fermentation is going - cross your fingers that it IS going.

-Jack

And here are a few bonus shots:

Wort is ready for the carboy - notice the three gallons of cold water already in the carboy and the cold water in the wort basin to begin cooling it.

My failed attempts at a makeshift funnel - REMINDER: buy a funnel.

Look at all that sediment - honestly I don't know if it's good, bad, or neither...but I bet it'll be okay.

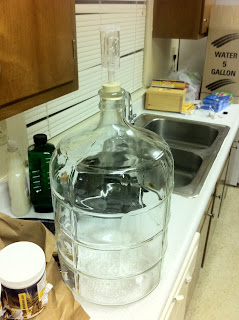
A shot of the just-sanitized carboy, stopper, and fermentation lock.

Followers